So what’s going on?

It’s been well over a year since the last post on here. I have been meaning to write up what has been going on at Sandpit Studio most weeks in the intervening year and a quarter but there always seems to be something more pressing. Today is no different so I shall make it brief and in no way chronological.

The control room build is (mostly) complete and I have been working in here since December ’13. The final acoustic control layers were fiddly and time consuming, particularly as I was reticent to be too exact in the initial design, knowing that the building prior to their installation would throw a highly detailed plan askew and waste much time/effort. I shall put up some photos soon to detail the work, but here is a quick rundown of what went in…

Resonant absorber bulkheads: significant depth at the front and back of the room was used to create a light timber frame housing a series of rock wool lined recesses fronted with light plywood (4mm and 6mm) boards acting as diaphragms for a resonant absorption effect. Some are rectangular and some are more complex shapes with a variety of depths to produce a general, or at least not over focussed, low frequency absorption. These have proved very effective and have helped produce an RT60 (or whatever you call it these days) of around 0.3 seconds in the 50-100Hz range – I have so far only managed to carry out a basic acoustic test to check nothing was too awry, and once a few final details have been finished and I can spare a day I shall carry out some proper tests to find any peaks/troughs and tweak some of the resonant absorber panels to adjust. Though I cannot effectively change the depth of the recess behind the plywood diaphragms to alter their resonant frequency, the plywood can be mass loaded and damped to make adjustments, though this is not a quick job – I’ll have to find a doozy of a low frequency dip to want to do it! So far, to my ear and the basic acoustic test carried out the low end seems pretty much free of any wonkiness, honkiness and ringing – franky it sound wonderful in here and has made me hyper-aware of how shit the outside world can sound!

Wideband absorbers: At the front of the room (behind the mixing desk and monitors) is a 1m high strip of cloth fronted wideband absorbers. These are rock wool lined recesses (again) fitted with a series of fanned out vertical fins made of plywood with a thin layer of rockwool on one side (held on/covered with cling film) and then wrapped in needled wool felt (used for furniture stuffing). There are a corresponding pair at the rear of the room either side of a bench seating recess, which has been dubbed the ‘Meat Baffle’ as it’s absorption/baffling will be a function of the presence of meat…human meat…or clients as they’re often known. Anyway…these absorbers are primarily to remove a wide frequency band of early reflections from all seated and standing listening positions, which they do well. Bloody cheap too. A final note on the bulkheads that house all this absorption: the light timber frame is mounted to the inner isolation frame of the room (there are two independent frames) and do not directly contact with the floor – all joins are buffered with rubber foam. The timber frame was lined with deadsheet (called SBM5), a mass loaded vinyl matting that weighs 5kg sq.m. whilst being 2mm thick. Terrible to work with, smells like rubber and Amaretto combined (simultaneously pleasant and unpleasant), but forms a heavy limp-bag affair within the recessed chambers that helps reduce low frequency transmission.

Diffusers: Two types of diffusion have been created in the control room. The first, and most visually striking, is a set of three timber Quadratic Residue Diffusers mounted to the front wall. These remounted over the wideband absorber strip. These were based on a prime number base of 23 to create a diffusion range that extends down into the low mids. It uses 47mm x 47mm planed timber lengths ranging in 10mm steps from 10mm to 220mm. In all there are 667 pieces, which took forever to cut (an hour everyday for a week or two). There is a mistake in the final layout chosen (I made a spreadsheet that plated the lengths according to the quadratic residue of modulo 23 and could then move it about to get the least regular spacings) as my only visual reference was a sheet of numbers (0-22) and so didn’t spot the satellite dish shape in the centre which acts, at dead centre, like a beam of mid-frequency – sounds great on a vocal, but not what you want in a control room. Adding a few pieces of timber (swapping four 20mm for four 240mm) will cure it. Apart from the beam the diffusers work well in keeping the mix position really monitor focussed. The second type of diffuser is on the side walls and is what used to be called a phase grating, which I saw in an old sound engineering book. For this I used a Primitive Root sequence (another mathematical system for generating pseudo-randomised patterns from prime numbers) to arrange vertical strips of plywood (9mm thick) over a felt-like material covered timber frame, itself partially filled with rock wool and lined with deadsheet. This has given the wall treatment a kind of mixed absorption and diffusion effect to reduce reflections and prevent resonances without over-deadening the space so that it is pleasant to be in – nothing worse than trying to be creative in a semi-anechoic chamber. The effect is also aesthetically pleasing with alternating strips of wood and white material, each a different width to the next (there are six widths from 20mm to 120mm), and the two walls have opposing material in the same patterns so wood is always opposite material, thus making sure there are no discrete standing wave opportunities.

More wideband absorption: The ceiling also features a light timber frame lined with deadsheet and covered in white felt-like material panels to form a nice light space above your head (the ceiling is about 2.6m). Inside the frame are a series of absorber fins like the wall recessed ones, though a lot less deep. I think there’s over 30 of them up there – I forget now as it took hours to cut, line and wrap the bastard things. Anyway, the minute they went in the effect was immediately, and pleasingly, obvious. This means my lovely parquet floor can bounce sound into the ceiling without it causing flutter echoes and the like.

The air extraction/inlet system in buried in the bulkheads with the grates mounted into a few plywood diaphragms. There is also a standard A/C unit mounted up above the rack gear area which barely ticks over to keep things nice and cool in here. I wouldn’t say the whole HVAC system is ‘whisper quiet’, but definitely quiet enough to ignore and inaudible as soon as you playback over 70dBA.

I made a three bay rack unit on one side of the room from leftover timber and fitted it with a simple hinged design so each section can be folded out to get to the rear of the gear, a feature that makes cabling and maintenance nice and simple. Two more rack bays form the mixing desk stand, one of which houses the five bantam patch bays that are immediately full. There is space for a sixth patchbay which should be enough if I ever fill the remaining rack spaces. The mixing desk, the late 70s Midas PR I have mentioned in other posts, is in place and semi weed in, but not ready for action as I have yet to build the custom centre section (mix buss summing and controls, and monitoring) and finish some of the channel refurbishments. All wiring in the control room, as well as tie lines to the live room, are installed and ready – I cannot count the number of solder joints I made, but its in the thousands. It was a little nerve wracking testing the patchbays, but I found no mistakes…that is until last week when I couldn’t get an output from one of my interface outputs (a 32 channel I/O Antelope Audio Orion) and discovered outputs 23 and 24 were the wrong way round. Glad it happened when I was on my own and not with a client during tracking – chasing faulty routing really kills a session. I love my patchbay and I get a peculiar satisfaction from seeing it at the end of the day looking like a rat’s nest of multicoloured wires – a real sign of work done. Having all my outboard to hand at last is such a pleasure. I’ve also made a wee pedal patch area at the end of the rack bays that sees a lot of action with reamping as well as guitar/bass tracking I’ve been doing in here for the Ghost Smoke album project that I’ve been working on sporadically with a couple of friends. It’s almost time for mixing on that, and I have been hoping to make it the first thing to come through the Midas PR, but we shall see as that’s a load of work. More on the whole Ghost Smoke thing in another post.

There is so much to say about this build, so more posts will hopefully follow soon. What’s left to do is mostly cosmetic – some final lighting pieces, the meat baffle seating cushions (sewing covers), and some painting/varnishing. I am at last getting around to the live room build, which is less complex, but a bit more ambitious in scale as the ceiling is just over 5m up – time for a proper scaffold tower and a winch (I’ve always wanted a winch).

A final piece of the sound puzzle here was supports for my monitors (Event Opals). I had initially hoped to build my own, but time and energy were at a premium when I moved into the control room so I bought some sand-fillable Quiklok monitor stands (2nd hand of course!) and blagged a review for IsoAcoustics L8R200s, which are short decoupling stands. They sounded like the perfect addition as the Quikloks were a bit of compromise as my own deign had a more comprehensive decoupling component. The IsoAcoustics are superb and provided the extra low frequency decoupling I needed – though the Opals are immensely heavy and well damped, there is still some serious energy there to try and keep from going through the floor and further. I thoroughly recommend them to anyone (they do a whole range of sizes) and they are worth the money (around £100 depending on size). Not sure I can justify any such solution for my old Auratones though, which now have bespoke wood platforms attached to the mixing desk stand/racks – some spikes or foam should see them good. I did build the platforms for my trusty NS10s, but as soon as set them up and switched them on I realised I just didn’t need them anymore as I really trust what I am hearing in this room with the Opals, a situation I haven’t had for along time (or ever really). The NS10s used to be great for a second opinion on mixes, but now they just felt like an added complication, and they also took up too much space in front  of my lovely homemade QRDs. The great thing is that I sold them for more than twice what I ever paid for them – I hope the new owner appreciates them and the accompanying Quad 405-2 as much as I did. Oddly the Auratones are staying as I still find them useful for focussing on the mid range and switching out the extremities of a mix – I’ve always liked listening to stuff on them quietly anyway, which is probably a little odd. The great thing is that now I can bash out a rough mix and it translates fine. I have yet to complete a full mix down in here, but if current results are anything to go by, if it works in the room it’ll work outside. It has been a hard time building this room (with occasional help from my partners in crime Roger and Brian), especially whilst trying to keep some work coming in and becoming a Dad, but when I get to work in this room it all feels worth it. Next stop: live room.

Triple rack bay on the right with Primitive Root 'phase grating' treatment behind - Quadratic Residue Diffusers behind desk mounted over sideband absorbers
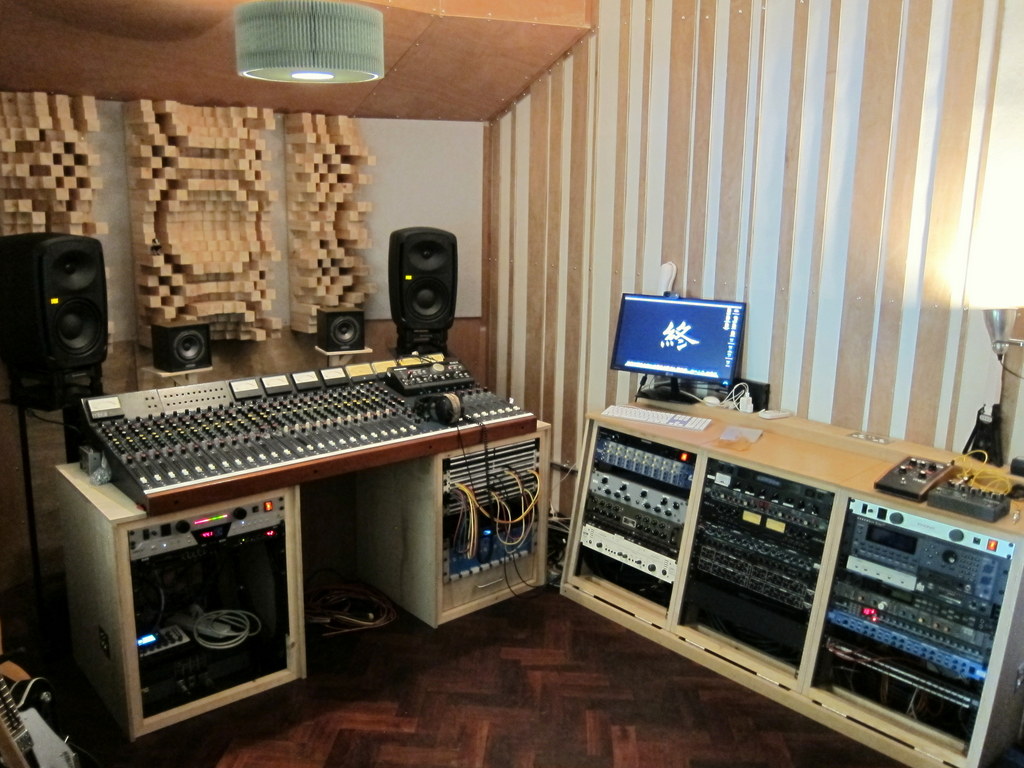
Triple rack bay on the right with Primitive Root ‘phase grating’ treatment behind. Quadratic Residue Diffusers behind desk mounted over sideband absorbers


Midas PR desk flanked by Event Opals with Auratones tucked in the middle..bless 'em. A few guitars on duty at the moment.
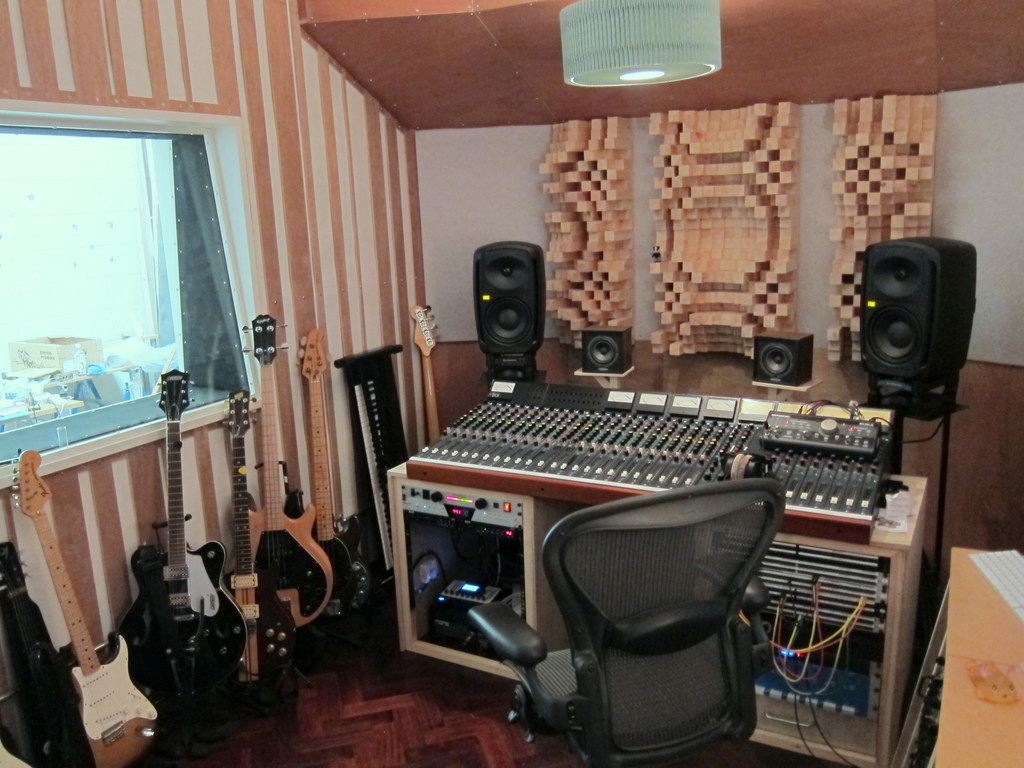
Midas PR desk flanked by Event Opals with Auratones tucked in the middle..bless ’em. A few guitars on duty at the moment.
The rear of the control room – resonant absorber plywood fronts, sideband absorber covers in grey, white absorber panels to the left covering the door to the boiler (with a hatch through the outer isolation frame). The yet-to-be-cushioned ‘meat baffle’ currently home to pedals and mics.

…and window too…

The window has been in for a while, but now the woodwork has been painted, along with the basic door frame. The doors and frame have been fire lined and the acoustic seals are almost finished, though the doors have yet to be bolstered (acoustically – it’s cheaper to get basic fire doors and add treatments to them). The seal is pretty damn good so far and some rudimentary tests have confirmed that the basic shells of the room are performing as expected…phew!

IMG_2813

I am in the process of finalising the acoustic treatment layers (wideband absorbers, diffusers, bass traps, etc.) and should start fitting them over the next couple of weeks – first off some space needs to be made in the other room as it is now full of offcuts, tools, half empty boxes, etc.

Floored

It’s all go at Sandpit in between chunks of sample and recording work. The parquet floor is down and finished, so here’s a couple of photos of it – mmm, yummy!

IMG_1616 IMG_1614

At the time of writing I have made a bit of a mess of this lovely shiny floor as the final acoustic treatment layers go in, but nothing a bit of a wash won’t sort out. I have ordered new soft rubber casters for the Herman Miller Aeron chair so it won’t gouge chunks out of the finish, though I’m sure in time a certain weathered quality will come to it anyway. Just have to make sure the decor tempers the current village hall/school gym vibe.

Winter Progress

The build continues at its own glacial pace with doors and ventilation getting a look in as the seemingly endless pile of parquet flooring blocks gets trimmed ready for laying.

Parquet Jenga tower

Myself and Roger have spent many an hour in gloves and masks working our way through the parquet and have got past the halfway point (~400 blocks). This is a picture of the blocks being dried after sponging off the sanding dust.

The air extraction fans have been plumbed into the exit box on the roof and I have dropped insulated ducting through the control room ceiling to test the custom silencer. It’s a simple chipboard box lined with acoustic plasterboard, which makes it a weighty bugger, to create a split with two direction changes to maximise absorption through reflecting the sound waves around as much as possible. The cross-sectional area also increases from inlet to exit (which is the opposite to the extracted air flow). The box was then lined with various acoustic foam materials I had lying around. As the box is split I could alternate linings to test which worked best. The final lining was then glued in place and quickly photographed with a variety of Sylvanian Family toy dioramas…because it seemed like a good idea…

The basic extraction silencer box

Extraction silencer with lining

Sylvanian Families hanging out in the silencer inlet

Completed silencer propped up for testing

Once the silencer was sealed up I managed to lift it onto some saw horses and plug in the ducting to check it performs as I planned. The result is a complete loss of the air rush and fan noise except for the lowest frequencies which are only audible if you put your ear to it. Considering the unit will be installed just below the ceiling that won’t be a temptation.

The control room doors have now been hung and are awaiting handles and sills. Though they are basic fire doors, they still weigh more than I’d like when fitting them. Now they’re on their ball bearing hinges they seem so light…bastards! They’ll still need to come off again before the final fit as seals need to go in yet.

Inner control room door hung

Outer control room door hung


And finally…the distribution amplifiers I mentioned in the last post have been tested and despite the ‘not-exactly-hifi’ spec of the initial buffer IC (UA727) they sound great and at minimum gain punt out a respectable balanced line level, but the gain trim pot allows for another heft which I couldn’t measure as I was just testing it through my Fireface line inputs, which on the Lo-Gain (i.e. above +4dBu reference) setting clipped before the distribution amp even sweated. I think driving up to 10 metres of cable to the monitor mixers in the live room shouldn’t be a problem then! They sound great, or at least transparent, so headphone mixes will be nice and crisp. Lovely.

Double glazing

Two panes of Optilam Phon hanging out in front of the harmonium

Today the glazing turned up – two 1m x 1.5m panes of Pilkington Optilam Phon, a name reminiscent of a Thai noodle dish. One is 10.8mm thick and the other is 8.8mm. They’re both made of two glass sheets bonded to an extra thick (0.8mm) laminate layer. I hope my calcs for matching the wall they will be sat in are about right; if not I shall be inserting a third panel between them in the frame (I am planning the frames to have a gap for such an event – nothing worse than having to take the whole lot out.

Optilam Phon – 10.8mm and 8.8mm


Whilst waiting for the glaziers to turn up this morning I continued the kind of obsessive task that makes building a studio suicidally long-winded for someone like me: drawing out the schematic for a distribution amp module. Years ago a friend and I bought two 3U racks of eight amps that drive 10 balanced outputs (600Ω) from one balanced input. I have decided to put one rack of them to use as the drivers for the eight channel headphone monitor mixers I shall be making for the live space – these suckers will be able to send to 10, which is 5 more than I think necessary for the space here. I can’t take any circuit for granted and have an Abbey Road approach to gear as I must know how it works and thus how to fix it. There aren’t any schematics available for these so I shall draw them out myself, which means lots of holding it up, flipping it over, prodding with hte multimeter and scrawling on a notepad. I’m most of the way there and will no doubt come up with a modification or two to make for a slightly better signal path (they’re a little lacking at the top and bottom, or a little midrange heavy depending on how you look at it). Here’s one now…

1×10 balanced distribution amp module

The large black box is a mains transformer as each module is self contained, thus no overall PSU problems, and having spare modules means I can swap them out mid-session if any futt-out. The input transformer is a cute little Beyerdynamic number. The UA727 dual op-amp that follows this is not a great delight on paper so I shall do some tests to see if (a) it sucks and (b) how to swap it out if it does.

So near and yet so far

It has been a while since I last scribed anything here, though I have often thought ‘ah ha, blog time’…but nothing. It’s late, I’m still awake and home alone so I might as well bash out a quick update.

The build of the control room at Sandpit Studio has been coming along, though my time spent on the project has been split with working (mostly making samples for Future Music and Computer Music, as well as the odd review/article thing and even more rare recording sessions) and being with my baby daughter. As of this moment the two isolation shells are up and sealed, the basic floated floor is in (rock wool, plasterboard and T&G chipboard) and the air extraction system is going in. The final floor will be parquet which has been reclaimed and is currently being trimmed of its old bitumen layer, which is probably the least pleasant task of the build so far.

One of the four piles of parquet

The parquet trimming booth

Tomorrow the glazing will be delivered, which is two 1m x 1.5m panes of Optilam Phon laminated acoustic glass – one 10.8mm thick and the other 8.8mm thick. The tricky task is to build the two angled frames that will hold them along with all the decoupling shenanigans that goes with studio windows. It’s time to get the router out and cut some super straight channels. Alongside this ‘beyond-my-paygrade’ job I will be installing the two door casings for the partially glazed fire doors, again keeping the decoupling techniques to the fore as well as trying to get it all millimetre perfect. In the meantime, here are a couple of photos of the room as it stands…

Control room and window aperture

Control room boiler access hatch

Though I won’t be using the boiler in my unit it needs to be left running for the unit next door and accessible for servicing, thus the hatch. The photo above show the two hatches in the first isolation layer – I have yet to make and install the inner isolation hatch, which will be a hinged door. The whole room will be fitted with a control layer frame to house and support the various acoustic treatments (diffusors, bass traps and absorbers), storage and recessed bench at the back of the room, air extraction/inlet ducting and mains/audio cable runs.

My absurd plan is to have the floor finished, the A/C and ventilation fitted and running, the mains AC dropped in and the doors/window fitted by Christmas so I can move the desk, workstation, monitors and some outboard in. This will allow me to have a couple of weeks off before starting the acoustic testing that will decide the exact treatment that will be fitted. I have a basic plan, but I really need to hear/see how my basic modelling predictions work out before continuing, as I could be a total dunce and have just not noticed. I am also desperate to move out of my daughter’s bedroom-to-be as it is now almost impossible to move around in due to the piles of desk modules, guitars/basses, pedals, rackmount gear, patch bays, monitors and computer stuff. It is also the room that the reusable nappies are dried in…mmmm, a fragrant accompaniment to editing and mixing.

Obviously a few bargains have been had since I last posted here, and here are some highlights.

Eventide ModFactor, 80s Arion Distortion & Compressor pedals

LittleLabs Redeye DI/reamp, Boss DE200 delay, BSS DPR402 compressor and JDK R24 EQ

The Eventide ModFactor is a whole bag of fun, as well as offering up a massive range of modulation effects, from the subtly tasteful to the completely f*@$ed. The fact that it has independently switchable I/O levels (instrument or line) makes it a useful stereo DI/reamper too. I have been using an Arion Stereo Chorus (the oddly sought after SCH-1) since I somehow managed to sneak it off my brother two decades ago and I love it, so recently I decided, like all pedal addicts, to collect more of the range. For a total sum of £21 I have added the SCO-1 stereo compressor and the SDI-1 stereo distortion. These are by no means hi-fi, but they have already proved themselves useful for guitar, synth and reamping duties. You can never have enough pedals. Never ever. On the subject of reamping, I managed to pick up, for a criminally low price, the Little Labs Redeye DI/reamp box. This is a top quality passive box that has seen constant usage since I got my grubby mitts on it (grubby from trimming bloody parquet flooring!). The adjustable reamp output makes feeding pedals a doddle, especially things like my Mu-Tron IIIs, EH Poly Phase and Doctor-Q which are amplitude dependent. In the photo this is sat on top of the 12-bit beast that is the Boss DE200 digital delay. I bought this off a friend who was downsizing his collection without hesitation as I have been coveting it since it was in a studio we shared some years ago. It’s crunchy and cranky but you can dub-out with it for ages in a way that posh delays and fiddly virtual ones never do. I may give it an overhaul soon as most of the LEDs only work when you hit it, and that’s just not a nice way to treat a unit. I have always wanted a BSS DPR402 compressor and as usual I have waited years for a bargain, but when it appeared I snatched it right up. As most of my outboard is packed away in storage this has been my analogue path comp for drums, guitar and synths (it’s not a great choice for bass). Below that in the photo is the JDK Audio R24 EQ, which I reviewed when it first came out under the shortlived API ‘Arsenal Audio’ brand (JVC claimed copyright on the name for some car radio bullshit – like people were going to get confused?!). Anyway, I really liked it but couldn’t afford it at the time. Sure enough one winked at me at less than half price – what could I say? Also I am lacking in outboard EQ so it’s needed – I have a Gyraf diy Calrec EQ in the pipeline as well to start filling this gap.

The other significant purchase was a Coles 4038 ribbon mic in mint condition which can now keep my refurbished original STC 4038 company. I used them on a drum recording for the Gallow Birds’ Ghost Smoke album project the day after I received the Coles. They were on overhead duty whilst a Royer R121 captured the kick and a Sennheiser MD441 nestled in with the snare. The two 4038s on their own sound beautiful, but rolling in a touch of the Royer kick fattens things up nicely and the 441, again just rolled in a tad, helps pick up the snare. Dust with a little compression (or imperial shitloads) and a sprinkle of HF and there you have it. The excellent drumming also helped (thanks Alex Lupo).

Enough of this, I don’t want to come over all Gearslutz…I’ll be A/Bing my pants next and talking about how Rupert Neve always darns his socks with transformer winding wire or something…

Fables of the Construction

After a month or more baby-induced hiatus the build at Sandpit is getting back up to speed, though I am still managing to fit in some sample making, recording and reviewing here and there. The outer timber frame for the control room is now up and feeling solid with the first order of mineral wool arriving tomorrow, though I really don’t know where it’s going to go as space is a little short during this build. I guess I’ll just have to wade into the job of wedging it all into place, a task reliant on the chicken wire I have ordered turning up in time; the chicken wire is to hold the mineral wool in place in the roof sections as well as to prevent slippage in some wall cavities. Here are a few photos from the last week or so.

Roger in the brace position

Control Room Outer Frame (door and window spaces in foreground)

There’s been a lot of this…

…and a whole load of this.

Renovations of the Midas PR mixing desk have also been on hold, but design work has started up again, i.e. I have started jotting stuff in my notebook and splurging lists and links all over Evernote. As an aid to this task I have managed to get a copy of The Handbook For Sound Engineers: A New Audio Cyclopedia edited by Glen Ballou. It’s a 1987 edition so doesn’t have many of the digital bits n bobs in the latest revision, but then again this cost me £11 costs instead of ~£80. The new one does have an excellent chapter on transformers by Bill Whitlock (of Jensen transformers), but this is available from the Jensen website as a PDF anyway. Amongst the audio gold (mostly acoustics and electronics) in this book is a chapter on mixing consoles with some great info and opinion on grounding issues, which are probably the most significant aspect with regard to sound performance and quality. It even mentions the use of the Dean Jensen designed 990 discrete op amp, a version of which that I am using in the mix-buss amplifier, as a method of getting much higher performance (lower impedance and noise ratios) though with the caveat that “this elegant device inevitably carries an elegant price tag”. Anyway, a f***ing great book which reaps rewards with every dip in, much like its predecessor The Audio Cyclopedia by Howard Tremaine which had it’s last revision in 1969; needless to say I have that too.

Awesome tomes of audio know-how – you won’t find this kind of quality on G***S***s!

And to prove how cool this book is and why you should get your own copy, here is an inspiring pictorial extract…wow…just wow…

The apex of sound engineer chic – it never got better than this.

Right, off to the Sandpit now to screw some shit together, then swear, take it apart, and screw back together how I originally had it…then splurge acoustic sealant all over it and make a cup of tea…and repeat…

March Movement

The build is now under way at Sandpit following a few weeks of prep (see previous post). Though some gear has gone to temporary accommodation and a basic rig is sat under the stairs at my house, including the 25kg-a-piece Event Opal monitors which may have rattled window frames a few streets away when I made a batch of bass samples at home!

The first major construction job has been the control room outer stud frame, which has meant filling the limited floor space of the studio with a not inconsiderable pile of timber, seen here accompanied by Roger and Brian who are voluntarily sharing construction duties…fools.

The photo to the right illustrates this initial space issue, which has now eased due to some of the gear pile being redistributed to houses and onto the temporary storage platform above. Now the stud frame for the outer shell of the control room is up we have some clear space to work in, until the mineral wool and plasterboard get delivered.
At the time of writing the control room outer shell stud frame looks like this – the 2″ x 8″ beams are just propped in place to select the best lengths of timber. The stud wall in the foreground shows where the window and door will go. Once the beams are in place the mineral wool, deadsheeting and plasterboard layers will be applied before the inner stud frame is constructed on a float of high density mineral wool. Work has come to a halt for a few weeks now as I am taking paternity leave, though still awaiting the arrival of the child at the time of writing.

In the mean time I have taken delivery of these two shiny new Carnhill transformers (VTB2281s) which will serve as the output bridge from the JFET992 based mix-buss amplifiers in the 70s Midas PR mixing console mentioned in previous entries. Can’t wait to wire ’em up and hear how they fit in. Having chosen the final modifications for the input and group channels there now remains the not-insignificant task of cleaning/lubing old pots and faders, cleaning some switches, recapping and making a few other circuit adjustments. The main monitor section has been designed and now requires final component selection and layout (buffers, multi-gang rotary switches, stepped attenuators, etc.) – this is obsessive’s heaven.

2012 Here We Go

I’m sure I started the year thinking ‘I shall post more often’, but as ever the juggernaut of time flattened that one. I find myself sat in an almost empty Sandpit Studio having spent the last couple of weeks packing away gear so the build can at last begin (building regulations approval was granted mid-January after I had submitted possibly the most over-detailed application for two soundproofed rooms ever created…the spreadsheets…oh the spreadsheets!).

Basic rig for the coming months

I have managed to make a 6U rack of essentials (mic pres, headphone amp, Lavry monitor/mix AD/DA, patchbay, RME HDSP and power distro) to keep recording over the coming months. There’s also a few cases filled with pedals, mics, cables, etc. And then there’s the monitors…


Possibly the hardest packing task was the expansive mess of electronics components, especially those associated with the Midas PR mixing desk renovation work. Everything had to be sorted, catalogued and boxed up. All done now and I may be able to squeeze that into my house for occasional fiddlings…this desk won’t build itself you know?!

This rather blurred photo (iPhone+strip lighting+evening+physical exertion=shit picture) is taken from the temporary storage platform I built to store gear/crap during the first part of the build, which is the control room. The boxing up exercise is in mid-flow, though ‘flow’ might be a tad inaccurate considering the amount of times I became paralysed by indecision (you never know when you want to get to a tape head de-magnetiser in a hurry!).
The prepping of the control room end of the unit has now begun and the first materials will hopefully get ordered within the next week. First up is the air conditioning unit and the air extraction fittings as the appropriate holes will have to be made in the external blockwork wall before the outer skin of the control room can be built up. Then it’s time for the timber framing. The whiteboards are out and the order of works is getting refined on them as I type this (I keep remembering details and going over to the board to put them on the list…maybe I just like the smell of the pens…).
Photos of the build and some attempt to explain them will follow soon.